Tuesday, December 31, 2013

When Homeowners Bully Contractors


All of us have heard accounts of a contractor who bullies a homeowner, but there seems to be a new flip side trend in which the homeowner becomes the bully. With homeowners spending money again, some will spend it attached with strings knowing the contractor is vying for their business. This is often fueled by various spectrums of cultural entitlement, and cable home shows that set unrealistic expectations of a remodeling process, time, and costs. While it’s true that contractors are in the service business, the sensible "give and take" method is becoming a lost common courtesy.

Some homeowners have made unreasonable demands on contractors, and bully them into doing work without getting paid. They keep asking for extras, but the contractor who continuously does extras to please the homeowners may find the relationship soured as profitability is reduced. Then there are those who will unreasonably withhold payments. This is can be detrimental to the cash flow needed for already covered expenses by the contractor and throws up red flags for future work with that homeowner.

Homeowners are often shocked when projects run over budget, but it is quite normal for there to be change orders that result in extra expenditures. We make sure our clients understand that an extra 10% to 20% (depending on the scope of the project) should be budgeted for the job. Yet there are some who live so close to the bone that they run out of money before the project is finished. This makes things very awkward and often times the contractor becomes the scapegoat for their poor planning.

Homeowners should be actively involved in the renovation process. However, if they have difficulty making up their minds over the smallest issues, or insist on controlling minute aspects of the work, or hover over the workers on site, the project could be a nightmare experience for both sides.

Finally, homeowners need to know what is an appropriate punch list item, what is not, and a time limitation for addressing them. We remodeled a staircase for clients who, after we left each night, would take a bright spot light and go over all the painted railings and steps. They called us out multiple times for little knicks or scratches that we fixed each time and the next day there would be a few more found. With two small very active boys running up and down the stairs without a care they couldn’t conceive that their children were creating the problems. Our resolve was to take pictures of the entire staircase as we left it and prove to them it wasn’t on us. Sadly, we have learned through that experience and others that in order to protect ourselves from redoing work we take pictures of our completed work before any mysterious damages appear and we’re forced to rework any of it.   

The bottom line, not all contractors are seedy, they’re just regular folks trying to make a living too.  Remodeling should be a collaborative process in which the two parties mutually respect each other. This along with common courtesy will net result in a great remodeling experience for all. And isn’t that what everyone wants?

Sunday, December 22, 2013

Unusual Items Found During Remodeling Projects


 Stacks of yellowed newspapers in dark attic recesses are the least of the surprises found when remodeling older homes. We found newspapers in the walls that announced the sinking of the Titantic on a 100 year farmhouse we were remodeling. Valuables that were once stashed away for safekeeping (and later forgotten), mummified critters that checked in and didn't check out, time capsules of building methods and materials that died out decades ago are among the many discoveries. It can be lessons in history and can add to the personality to the home when these are found.

Weird things found include an antique trivet, an old iron carpenters punch, and a Victorian tulip cover. Also, some old Art Nouveau-ish wall paper, some of it on the backs of scrap blocking for baseboards. Another remodeler found a corn cobb pipe hanging on the side of a stud on a nail. Hand written names, dates and weather from the carpenters who worked on the house before.

Here is another good one that always makes homeowners shake their heads in amazement. In bathrooms, the old steel medicine cabinet inserts from right after WWII had slots in them to dispose of used double edge razor blades. One bath they found a pile of rusted together blades that was the width of the stud bay and about 6-7" high. Either a BUNCH of men lived there or the guy changed blades every other shave!

We did a whole house remodel for a gal who was a widow. She bought the home from a couple in their 80's who were the original owners. It just so happened that the contractor and the homeowner were in the room while the guys were doing demo in an office. When they knocked a hole in the wall an old revolver fell out of the wall on onto the floor. Both guys immediately threw their hands in the air and said, "Not mine!" The homeowner didn't know it was there, and we all wondered why the original owner (long since passed) would have hidden it in the wall. We gave the gun to the homeowner and never heard another word about it.

Sometimes we remodelers feel like archeologists, a little like Indiana Jones, thankfully no snake pits yet, Anyways we’re always thrilled with our discoveries, our little version of the Dead Seas Scrolls. Let us know if you find any little treasures in your home.

Tuesday, December 17, 2013

Termites!


You do your best to keep your house in good shape. It has been painted, you’ve updated your windows, and even the small holes in the exterior have been fixed. Yes, your house looks amazing and you are proud of it. How would you feel, then, if you found out that your house was rotting from the inside? What if there are thousands, possibly hundreds of thousands (maybe even millions!) of termites feeding off of your house and slowly decaying it while you have no idea whatsoever? Unless you live in Alaska, there’s a good chance that your home could get infested very easily by termites, which cause approximately $5 billion in damages annually. Not even the White House or the Statue of Liberty are safe from termites, as both have undergone treatment to rid themselves of these wood-chewing insects.

While you might have heard about termites your entire life, there’s a good chance that you may have ever actually seen one. Termites are small insects that measure anywhere between a few millimeters to a few centimeters in length. There are over 3,000 different species of termite worldwide. A termite colony can consist of a few hundred or up to millions of termites. A home that is within a half-acre of a termite colony can be at risk of infestation, so it is easy to have an infestation travel from one home to the next throughout a neighborhood. Subterranean termites often tunnel underground and produce swarms of winged reproducing termites that emerge once a colony has matured for a few years. Dampwood termites are attracted to, as their name indicates, wood that is damp. They are attracted to moisture and are typically found in more coastal areas. They, unlike the subterranean termites, never live in the soil, but stay in wood where they feed and lay their eggs. Drywood termites live along the southern border of the United States, as well as in the coastal areas of Florida and California. They, much like the dampwood termites, prefer living within a wooden structure and are not found in the ground.

Termites ruin your house by feeding off of its wood and some other building materials. They can be especially dangerous if you have a pier-and-beam foundation, as it is easily accessible via the soil and a good portion of it is hidden from your day-to-day view, often times leaving damage undetected. Interior walls can be infested for years before a homeowner finds out, causing extensive damage. Termites have even been known to ruin furniture, ranging from book cases to antique dressers. It is for these reasons, that you should do everything you can to ensure that your home is not infested and take immediate action if it is.

As the damage that termites can do to your property can be very serious and expensive to repair, you should periodically check around your house for signs of infestation. During the spring is when most termites swarm to look for new colonies. Swarming is when winged termites fly away from their colonies to establish new ones. You can often find discarded wings or dead insects near your house when swarming has occurred. Winged termites look a bit like winged ants, so they can sometimes be difficult to identify. Hallow or rotted wood is often a spot-on indicator that there is a termite infestation. Often times it will appear that only water damage has occurred near where termites have infested, but given that they are attracted to damp areas, be sure not to right off the possibility that termites are present, as well. Drywood termites often leave pellets that one might mistake for mouse droppings. Look for these pellets along window sills and other wooden areas in your home. If you find hallowed wood or wood that has specs of dirt in it, that is another sign of a termite infestation. Sometimes subterranean termites build tubes out of mud and dirt on exposed areas of your house to travel in. The tubes are about the size of a pencil and made out of mud. If you find any of these indicators, contact a termite specialist immediately, before any additional damage is done to your home.

Saturday, December 14, 2013

Making A One Of A Kind Look


The owners of this Lake Oswego home, purchased new to them just a few years earlier, were ready to change up the kitchen. Because the oven had finally ceased to work, along with the other tired appliances, the reasons were easily justified. The tiled granite counter tops were too busy, on the dark side, and of course dealing with the grout lines just topped the list of annoyances. What they didn’t want was a full kitchen gut with new cabinetry. She wanted a solid surface counter top that was light in color, but not a solid humdrum color. The solution was to install a 3CM CeasarStone Dreamy Marfil slab. This stone is dreamy with its light veins in it and has the appearance of marble with absolutely no maintenance. It works well when combined with other elements including the oak cabinetry. To soften the 80’s awkward corners on the island, the kind that hurt when you bang into them, the new counter top was cut with a larger radius of rounded edges.

He wanted a backsplash that had some contemporary glass and a natural stone texture to it. After viewing many options he decided to generate his own design plan layout for our skilled tiling guy to mimic. The Salceo 10x14 in Cortez Beige and ½” Designer Glass in Emperador Mix Mini Roman tiles were meticulously laid out in a cohesive look that really gives the kitchen that punch of an unexpected surprise, which is exactly what they wanted to accomplish.
Because the new stainless steel wall oven, warming drawer, and microwave were different sizes than the original appliances, we modified the one cabinet unit to accommodate the new ones. It’s as if it was always that way. New electrical circuitry for all the new appliances were installed, as well as matching stone plates on backsplash, and new under cabinetry lighting to enhance the one of a kind backsplash.          
 
BEFORE: notice the cut counter top corners and wall oven combo

AFTER: much lighter look

AFTER: a seamless look

AFTER: new wall appliances fit to a perfection in old wall cabinet unit
 

Friday, December 6, 2013

Protecting Your Pipes During the Winter

While it might be “The Most Wonderful Time of the Year” for your family, especially the children, the pipes in your house are singing a different tune: “Don’t Let Us Freeze!” Freezing pipes can be inconvenient, dangerous, and very expensive. You see, not only does water stop moving when it’s frozen, it can actually lead to the pipes in your house bursting. Burst pipes will not only take away your hot showers during the cold season, but they will also cripple your holiday shopping budget, as it can be very costly to have them fixed. Obviously, the best way to deal with pipes bursting is to prevent it from happening ahead of time.

Pipes typically burst when there are exposed or uninsulated lengths of pipe on the exterior of your house. While water does expand when frozen, causing bottles or cans of soda to burst in the freezer, this is not what typically causes pipes to burst. Pipes burst due to ice blocking water pressure between the ice and a faucet, typically bursting at a spot where there is little ice to be found! Opening your faucets slightly to allow movement can greatly decrease the chances of pipes freezing or bursting. The cost of increased water usage are dwarfed by the cost of having your pipes replaced. Placing insulation over all over your exposed pipes outdoors is a necessity during the winter, especially if you plan on leaving town.

If you plan on being away from your home for extended periods of time during the winter, there are other things you can do to prevent returning from a trip to a house full of burst pipes. Definitely have a friend or family member on alert to swing by your place and run some faucets during a winter storm. Perhaps the most effective thing you can do is to shut off your main water valve and then turn all your faucets on until no more water comes out. That will empty your pipes of any water that could potentially freeze and cause serious problems while you are out of town. Obviously, this might only be necessary if you live in a climate that freezes for extended periods of time.

Typically pipes freeze when temperatures reach 20°F or below, but it is still wise to have insulation on hand for any time you expect the temperature to fall below freezing. Insulation should be taped around any exposed pipes and you should use an insulated cover over any exposed faucets around your exterior. Unfortunately, some pipes in your outer walls may not be properly insulated, leaving them vulnerable to cold weather. In these cases your best defense is to run water through your faucets to keep it from freezing. You don’t need to open the faucets all the way to have water blast through them to keep them from freezing, just a small amount of flow should suffice.


If you suspect that one of your pipes has burst, contact a plumber immediately! Many more problems will crop up if you have a water leak on your hands, so go ahead and shut off your main water valve, as well. And once again, call a plumber right away.

Sunday, December 1, 2013

Choosing the Right Hood Fan for Your Kitchen


The cooking process in our kitchens has some unfortunate by-products: grease, moisture and odor. Proper ventilation can help minimize the effects of those fat droplets and neutralize smells in the heart of your home. It's not the most glamorous part of a remodel, but one of the main decisions you should make is the type of ventilation for your kitchen. Before you think about how a hood fan actually looks, explore the technical considerations. An island fan makes a strong statement in the center of the space, but it could fight for attention with pendants or chandeliers. On the other hand, a downdraft fan system lets you install a cooktop inconspicuously — even in front of a window. Being aware of your options could have an impact on the way you lay out your kitchen.

Use this mini guide covering the lingo to help you find the right hood fan for your kitchen.


Cubic Feet per Minute (CFM)

The first thing to consider is how much power your fan needs to have. A range hood's performance is measured in Cubic feet per minute (CFM). The higher the CFM number, the more air the range hood can remove in one minute of operation.

Your CFM needs depend on the size and the type of your range or range top, as well as the type and frequency of your cooking. For example, a large six-burner gas range requires more CFMs than a 30-inch-wide electric cooktop.

The requirement for an electric stove is 300 to 450 CFMs, whereas a gas range will need about 600 to 1,200. This number is based on the amount of BTUs (British thermal units, a gas appliance's performance measurement) divided by 100.

Sones
Many people don't use their kitchen fan because they find it too noisy. Don't let that happen with your new kitchen design. A fan's sound output is measured in sones — an internationally recognized measurement of loudness as perceived by a person with normal hearing. Some of the manufacturers will provide that information in decibels (dB) rather than in sones. Fans typically have three to six speed settings. Consider keeping the low setting, which is usually around 3 sones (at the sound level of a refrigerator running), on throughout the cooking process, and ramp up to the highest setting of about 7 sones (at the sound level of traffic noise) only for short, intense periods of cooking.

Blower Options
You have another option to cut down on fan noise: The blower part of a fan can be located in 3 different areas. Typically it sits in the actual carcass, or body, of the appliance. This is the version that creates the loudest sound. There is also an inline blower, which sits halfway in the duct run, either between ceiling joists or in the attic. If you have a complicated duct installation — either because it is very long or because it has a number of turns — an inline blower can also be added to your main blower to strengthen its power.

Make-Up Air
Don't under estimate the need for a make-up air system in your HVAC system, especially if you choose a strong hood fan. High-powered hood fans take out large volumes of air. If this air is not replaced at the same rate that it is expelled, this results in greater air pressure outside the building than inside (a vacuum effect). A make-up air system replaces the air that is expelled by a building's exhaust system, makes sure your exhaust systems work properly and supplies conditioned replacement air that can be heated, cooled, humidified or dehumidified to suit your specific living environment.

Mounting Height
This refers to the installation height of the appliance: the distance between the filter of the range hood and the burners on the range below. The standard distance between a countertop and the hood is typically 30 to 36 inches. Some of the under cabinet models and microwave hood combinations are installed at a lower height.
The farther the fan protrudes from the wall, the more it will be in your face — literally. And the taller you are, the more you will be affected by the unit, so please do not just rely on what is considered the standard installation height. First and foremost, your kitchen needs to suit you.

Capture Area
This is the term for the range hood’s footprint. It is measured in width and depth of the range hood itself in relation to the cooktop below. Technically, the width of the fan will match the width of the range or cooktop. Its depth should cover the back burners and at least half of the front burners.

Grease Filters
The Vent-a-Hood centrifugal system, mentioned previously, has an easy-to-remove grease trap — either wipe it clean or put it in the dishwasher. All other vent models (should) feature stainless steel filters that are dishwasher safe. Make sure that you take out the filters at the appliance store to see if they're easy to remove.

Recirculation
When it's impossible to ventilate the range hood to the outside environment via a duct, a model with a recirculating kit allows air to be cleaned through a carbon filter that traps and quarantines cooking by-products. Once the air passes through the carbon filter, it is reintroduced into the kitchen, grease and odor free.You will need to clean or exchange those filters regularly.


Information from Ines Hanl, Houzz.com

Wednesday, November 27, 2013

Now You See it ...Now You Don't


BEFORE WALL

BEFORE LAUNDRY ROOM
Working with previous clients, phase two required removing the clunky walls that housed a powder room accessed through a short hall to the garage door. Directly opposite the powder room was the old laundry room which was moved upstairs last year. The new powder room now fits nicely into the old space. In order to keep the house structurally sound a 20’ beam was placed and extended across the dining space. The homeowner’s elected to stain finish it for a natural rustic look verses wrapping it with sheetrock and painting it. We also extended out the Mill House Maple Caramel laminate flooring and into the powder room, thus creating the illusion of a much larger space. The walls were painted Sherwin Williams SW7634 "Pediment", a muted palette that’s easy to live with.   
DURING
AFTER
 
The new powder room has a new clean lined “expresso” colored vanity. The old florescent ceiling module is now replaced with a very chic chandelier adorning hanging round crystals. The walls were painted Sherwin Williams SW7652 "Mineral Deposit". The exhaust fan was replaced with a new Quiet Whisperer model, which wasn’t so quiet at first. After evaluation, it was discovered that their original venting system was composed of the flexible piping (the kind you find just behind dryer venting). New rigid proper diameter sized venting was the resolve in getting the rattling to stop after a few bouts of frustration from Don.   
 
We also did a minor remodel into their kitchen which will be entered into our gallery in the near future. This new wide open space has given this family more living room that comes from what you feel, not just what you see.      


AFTER - NEW BATHROOM

Cheap and Easy Last Minute Thanksgiving Decorations


Can you believe that Thanksgiving is only a few days away? If you’re anything like my family, you haven’t even begun to start decorating the house for the guests that are coming over. Between managing work, coordinating multiple Thanksgiving dinners (thanks a lot, in-laws!), and keeping the kids out of trouble, it can seem like a gigantic burden to get the house looking festive. Well fear not, friends! I will provide you with a few easy and inexpensive ways to make your house looking Thanksgiving-y.

Considering that the place people will be spending the best part of their Thanksgiving dinner is the dining table, it seems like a good starting point for decorations. Perhaps the easiest decorations to place on your dining table are gourds. Pumpkins, gourds, and acorn squash are all very festive vegetables that are in abundance at any grocery store during the holidays. The pumpkin and acorn squash are both awesome for cooking during the holidays, as well. There is a plethora of recipes online for pies, soups, and other types of dishes prepared using these vegetables. Another fun idea with small pumpkins is to make a card for each one with a different guest’s name on it. Place each pumpkin at the table where you think the corresponding guest will sit. This is an activity you can involve the kids with that is both fun and festive. You can also use candleholders as an elegant way to elevate small pumpkins on the dining table.

If you’re working on a budget like my family, there are many other ways to save money on decorating the table for Thanksgiving. Don’t be afraid to buy chipped or damaged decorations. When staged correctly, no one will notice a small chip. Thrift stores and estate or garage sales are typically the best dumping grounds for old decorations, but one would be surprised at how easy it is to get a discount on damaged merchandise at popular retailers. Most brick and mortar stores don’t really want damaged merchandise floating around their store and will eagerly discount things to get them out of the door. This doesn’t just apply to decorations, either. If you are short on plates or bowls, you can typically use cheaper or slightly chipped pieces and make them look fancy by placing a cloth napkin in the middle. Of course the napkins should match and be seasonably appropriate; also, they won’t look very nice unless you fold them in an appealing manner. Another alternative is to purchase cheap seasonal plating. You’d be surprised at how little you need to pay for plates with fall designs on them.

Aside from the kitchen table, there are an abundance of areas in your house that or perfect for cheap decorations. Pumpkins, pumpkins, and more pumpkins is a good motto for decorating your living areas on Thanksgiving. You can put pumpkins on your bookshelf to use as book stops, on top of your entertainment center, your coffee and end tables, and next to any snack areas you have set up in your home. Acorns are also a very appropriate fall decoration that you can get for free just by going on a walk. If you have children, they will relish in the opportunity to collect as many acorns as they possibly can for your decorations. You can make festive candle holders by placing acorns in mason jars with a candle in the middle. Even just filling up a glass with acorns can look beautiful, just make sure you clean and dry your acorns ahead of time.

The first thing people see when they arrive to your house for Thanksgiving dinner is your front yard. Once again, the pumpkin philosophy of fall decorating applies to your front porch. If you have a wheelbarrow that’s in decent shape, fill it with pumpkins and put it on your porch. You can make a wooden sign with a Thanksgiving greeting and rest it on the pumpkins. Broomstick scarecrows can be fun to make with the kids and hang from the front door. You can use a step ladder to make a multi-tiered decoration with pumpkins and other fall decor to place next to your front door. Fall-themed pillows on a chair can be effective, as can using a basket filled with gourds and pumpkins. As with any decorating project, use your judgment when designing and placing your decorations and never go overboard.

Lastly, let’s not forget about the bathroom when it’s time to decorate. Pumpkins and fall scented candles can be placed on the sink and any open shelving in the bathroom. Even the back of the toilet can be used to place decorations or fall-themed air fresheners. Why not use some of those acorn candles we talked about earlier for added atmospheric lighting in the bathroom? Fall-themed Kleenex boxes and towels are always a bonus, although if you’re operating on a budget you might not want to shell out for a new set of towels.

I hope some of these ideas can get you excited about decorating and feeling less overwhelmed with the holiday approaching. Remember, you don’t always have to go all-out with your decorations to make a positive impression on your Thanksgiving guests. Besides, the holiday is about being thankful and being around loved ones… and food!

Tuesday, November 19, 2013

Considering being your own General Contractor?


 It can be tempting to have control in a project. To be the one who hires the tradesmen, orders and inspects the materials, checks and double-checks figures and costs, and perhaps most importantly, makes the rules of the project and enforces them. If that appeals to you, than you might be considering acting as your own general contractor. But should you?

Diving into the world of renovation is unchartered territory for a lot of homeowners. Many first time remodelers end up spending a lot more money than they need to because of a lack of knowledge about construction and materials costs. While you might have a keen interest in construction or remodeling, that doesn't a professional make. You’ll need the ability to speak the industry language, read the architectural drawings, understand the processes in accomplishing a result. You'll need to describe the job and schedule accurately, not to mention negotiate prices, draw up a binding contract and even take responsibility for getting I-9s and tax documents.

And while you're at it, don't forget that you may be responsible for all permits. You'll have to research what work requires a permit in your city, county or state and fill out the paperwork and get it submitted. You'll also be in charge of dealing with the inspections that come along with the process. Subcontractors might not be interested in committing unless your permits are complete.

The biggest reason homeowners become their own GC? Money, of course. GCs are trying to run a business, no different than other professionals who have credentials and experience. That means making a profit and covering the overhead cost they typically will add between 15 and 20% to the cost of materials and labor.

Who cares about time and hassle when you can save money, right? Not exactly. Consider that a large part of a GC's job is to figure out how costs can be minimized. This could mean a variety of savings that homeowner doesn't have access to like preferred vendor discounts on materials/products, and simply knowing who has the best deals on what.  Logistics is also a large part of a general contractor’s job description to coordinate all work done by subcontractors. It is these relationships that typically get GC’s better pricing and scheduling because of the volume of work, whereas a homeowner is a one trick pony show. The GC also checks to see that the work is completed in compliance with local building codes; warranties the work and deals with any problems that develop during and after construction; and collect lien releases and process payments.

In general, being your own GC is probably a bad idea for the average homeowner looking to save money on remodeling costs. But if you do have inside knowledge about the construction industry (or are willing to spend a serious amount of time learning about it), then being your own general contractor might be a realistic way to cut expenses.

Monday, October 28, 2013

Taking A Vintage Bathroom To The Next Level


BEFORE
This 1935 Lake Oswego main floor bathroom had vintage charm with bead board, pedestal sink, and unfortunately a vinyl flooring replicating a classic tiled look. The bathroom overhaul included a full gut, and reconfigured footprint behind the door to accommodate a new front hall closet on the outside wall. The 1980s cut out notch in the original shower wall was closed up for a full tub surround enclosure and we kept the original laundry chute access that is now housed in a gray cabinet supplied by the homeowner. The pedestal sink and bathtub were also repurposed.
AFTER
 
Keeping a classic black & white theme, the new look incorporated new ceramic tile from floor to chair rail height in “ice white” subway tiles with individually cut black Harlequin tiles set between rails to create a unique border all the way around the room and tub surround. And for further visual interest a black border was placed in the upper walls of the shower. A radiant heating floor system to keep your feet warm is set under the new 1”x1” octagon tiles with a Harlequin black dot border meticulously laid following the room’s perimeter including a four dot spray in front of the pedestal sink. This is truly a one of a kind beauty. A new “Soft Whisper” exhaust fan was installed to keep the moisture out and wall heat register replaced with new HVAC venting in the ceiling. New plumbing hardware in brushed nickel, a vintage style chandelier strategically placed in sync with the exterior window, and new crystal vanity light complete this up scaled vintage look.  


BEFORE - shower wall

AFTER - Shower wall

BEFORE tub surround

AFTER tub surround

AFTER - New Floor
 

Sunday, October 27, 2013

Spooky Things Found In Remodeling Houses


In remodeling, you never know what you may encounter when tearing out walls. It’s the things you can’t see and unexpectedly discover that can send chills up your spine like a good horror flick. Also, it’s kind of creepy to think about things moving behind your walls or above the ceiling, after all this is the sanctity of your home and these are not invited guests. In our history we have discovered carcasses of birds, cats, possums, and some unidentifiable species in spaces that make you ponder. In one house there were a six dead squirrels piled on top of one another that had electrocuted themselves by chewing through a wire. Squirrels apparently aren’t very smart since they didn’t depict from their friends’ demise the hazards of chewing, especially on the same wire. Another memorable incident was the bat cave. 
 
Upon removing to replace the siding in the peak of a 100 year old home we watched over 100 bats who fled from their coveted home into the sunset. Upon returning they discovered their eviction notice and the home was boarded up. Also, more common than you’d want to think about, we find rat or mouse trails cut into the insulation behind the sheetrock or fiberglass shower stalls.   

What’s more creepy? Discovering what these unwelcome intruders can do to the safety of your home and family. In the case of the squirrels, had it not been discovered, the damaged wire would have eventually ignited a fire in the attic space. In addition to damaging structural or mechanical components to a house, unwanted animals can leave urine, droppings, and/or dead carcass odors that may have you perplexed as to what is that smell? Some rodents can carry rabies. But don’t freak out, here are some preventative measures to help deter some of these animal break ins:

MICE can fit into an entry hole ¼ inch or larger.
Likely entry points: Garage, basement, gaps around utility lines.
Signs of infestation: 1/8-inch-long droppings; smell of urine; noises at night; holes gnawed in food boxes.
Best spots for traps: Along walls; anywhere you suspect activity.
Preventive measures: Seal exterior gaps with mortar; weatherstrip the bottom of basement and garage doors; keep all foodstuffs in hard plastic, glass, or steel containers.
Stopgap measures: Stuff copper mesh or bronze wool into foundation cracks.
RATS can fit into an entry hole: ¾ inch or larger.
Likely entry points: Garages, basements, rotted sills or foundations, damaged or unused drain pipes.
Signs of infestation: Black, greasy smudges around openings; smell of urine; ¼- to 5/8-inch-long droppings; nests of discarded food; fur; matted-down insulation; gnawing and squeaking at night.
Best spots for traps: Poisoned bait stations outside the house and around the perimeter of the property line.
Preventive measures: Eliminate all water and food sources around the house, including bird feeders and pet dishes; store food (pet and human) in airtight containers.
Stopgap measures: Cover entry points with hardware cloth or 16-gauge steel flashing.

SQUIRRELS can fit into entry hole: 2 ½ inches or larger.
Likely entry points: Where dormers meet roofs or where roof shingles overhang fascia boards. (The second-story men of household pests, squirrels can jump 10 to 12 feet through the air.)
Signs of infestation: Scampering noises in ceilings or attic; insulation missing from spots near eaves; ½- to 1-inch-long droppings; piles of nuts.
Best spots for traps: Live traps, clamped in place near the spot on the roof where they're getting in. Bait them with peanut butter, dried corn-on-the-cob, or suet.
Preventive measures: Prune trees away from house; keep roof and exterior trim in pristine repair; remove bird feeders.
Stopgap measures: Nail hardware cloth over potential entry points until they can be repaired.

Skunks: These four-legged stink bombs will easily burrow under your patio slab or stake out territory in your garage, crawl space, or basement. Hire a pro to trap them live and transport them elsewhere.
Bats: Given the opportunity, they'll happily take up residence in your attic for the summer and leave behind potentially disease-ridden guano as a present. Seal off their entranceways with a double layer of insect screen and hardware cloth, but only after you evict them first (Bat species are protected nationwide). Call in a pro to erect a "bat flap," a layer of screen that lets the bats crawl out but blocks their way back in.
Birds: In spring, starlings and sparrows have a knack for building nests in hidden, difficult-to-reach openings in a house. The louvered vents for dryer exhausts and the openings behind roof fascia are perennial favorites. Bar them from entering with hardware cloth. Take down the bird feeders that are attracting them to your property.
Raccoons: The masked marauders of the animal world, they'll barge down chimneys and into open garages or attic vents. Best captured with a live trap baited with peanut butter, suet, raw eggs, or dried corn on the cob. To keep them from coming back, cap your chimney, keep basement and garage doors closed, eliminate bird feeders and outdoor pet bowls, and lock down trash lids with bungee cords.
Snakes: In the fall, they'll work their way into openings around basement doors or cracks in foundation mortar, looking for a place to hibernate. They'll leave of their own accord when the weather warms up in spring. Seal those openings behind them.
Preventative measures information by Joseph D'AgneseThis Old House magazine

Wednesday, October 16, 2013

A Moderate Kitchen Remodel with a Touch of Pizazz


The homeowner’s of this Lake Oswego home wanted to update their 1970’s U-shaped kitchen without changing the footprint, cabinets, or breaking the bank account. They had installed, a few years earlier, beautiful Brazilian cherry wood hardwoods that made the kitchen look kind of drab. The problems included worn out laminate counter tops with matching backsplash outlined with an awful metal strip, and limited counter top space. They wanted something practical, classic to last, light in color, with a touch of pizazz - what we call the jewelry in completing a space. After getting an idea of their wants we formulated an approved design plan and took a trip with them to a vendor’s to look at hard surface selections armed with a kitchen cabinet drawer for color specifications. 

BEFORE
 
BEFORE

AFTER
Behind the sink was the original wood decking that extended into the window area. We pulled that out, supported it for the 3CM Santa Fe Tan Polished Pental Quartz stone slab that now extends into the window niche. A single drain under mount stainless steel sink along with a counter top mounted push bottom for the new garbage disposal gives this a clean look. 


What makes this kitchen is the backsplash called Coral Mix Linear mosaic. It’s a glass and travertine stone mix that adds a modern flair and texture too. To highlight the backsplash and give optional kitchen lighting LED light strips were strategically placed under the upper cabinets.  


The counter top space solution was to install of GE Spacesaver 1.5 cu ft Microwave over the range in Stainless Steel to match the existing appliances instead of having one sit on the counter. We modified the existing cabinets to fit the new self-venting microwave. The small screen TV that took up some valuable space was removed too. The owner’s swear they don’t miss it and claim they are enjoying conversation at the kitchen table now. This minor makeover made a large impact bringing this space back into the 21st Century.

Monday, October 14, 2013

How to Overcome Remodeling Sticker Shock


 You’ve researched pictures on houzz.com, Pininterest.com, thumbed through dozens of home magazines and have found the desired look you want for your kitchen or bath. After conveying the plan over with a contractor that includes the entire wish list (and why wouldn’t you want all the bells and whistles?), you are squirming in anticipation to get this project started. However, sometimes the wind that you thought would be sailing you along into your dream room is knocked right out from under you when you see the estimated costs. This is called Sticker Shock, a problem that occurs far too often for homeowners.

Too often homeowners attempt to estimate a project themselves by comparing what the neighbor’s did last year and/or they feel they can do it for less because they’re putting in linoleum instead of hardwoods. Or they watch Cable TV remodeling shows that quite frankly skew the real costs. It’s very easy for a person excited about remodeling to mislead themselves. Don’t assume the contractor’s bid is way too high right out of the gates, he just estimated your project from what you told him you wanted (remember the bells and whistles?). Unless you made it clear to him, he typically doesn’t know what your true budget is. Here in lies the problem; do you really know what your budget is?    

Try determining a total dollar amount or range you feel comfortable investing in your project. Prepare a general overall “wish” and a “must have” list for your project before getting an estimate. Then search for a remodeler that can offer both design and construction solutions. Many homeowners may rule these companies out as being too expensive. The truth of is if you desire to have the best end product, remember your home is your biggest investment, these companies will provide the reality check that you need. It may boil down to compromises; many costs within a project can be controlled by the amount of work to be done and materials/products used. Don’t let sticker shock halt your dream, once the reality of costs sets in, work with a professional who can help you find a resolution best suited for you and get to sailing onto your remodel.

Friday, October 11, 2013

The Possible Money Pit


Many consumers are not fully aware of the costs associated with not pulling permits (structural, electrical, plumbing). Since unlicensed contractors can't pull permits for home improvement projects, it’s important to hire a licensed contractor and get the proper permits. For many “DIY’rs”, acquiring permits with the latest regulations and codes can be intimidating or it’s just a matter of saving money and they skip it all together. But are you really saving money?  

The repercussions to the homeowner when permits aren't pulled on time or at all can be evident at time of selling the property. The house most likely won’t pass inspection. Insurance policy modifications or changing companies often require a Certificate of Occupancy. If the certificate doesn't show structural changes that have been made, the insurance company can decline coverage because it's not code compliant. Any permits pulled after work has already been completed include a fine that doubles what would have been the initial costs of pulling a permit before work was done.


On the flip side of that, many new home buyers who take the precaution trying to know what they’re getting themselves into including having a pre-inspection along with City Property Tax documentations before finalizing the paperwork may be buying into a money pit. We found that out in a 1935 home we remodeled that was sold with an existing addition with a 2nd story that later revealed it was illegally added to the original structure. The addition was built on top of an original carport and the only thing that was holding that side of the house up was the roof connection – YIKES! We also found 60 electrical code violations in one room itself, amazing that the house never burned down. There were joists that were not connected and plumbing placed haphazardly. It was a hack job. In order to properly put the house back together we had to install micropile piers placed into the foundation and reinforce the foundation to hold the structure and basically start over. Because the previous homeowner’s had built the addition decades before the statute of limitations was expired for any legal retribution. This cost the new homeowners thousands of dollars that could have been spent elsewhere on the remodel, let alone all the headaches and delays. It’s just not fun to spend money on things hidden behind the walls and flooring. Yet, the house is now safe and structurally sound for occupancy. Lesson learned: do your due diligence and do it some more.      

Tuesday, October 8, 2013

Reducing Your Stress With a Bathroom Remodel


The bathroom in modern American life can be viewed as the sanctuary of the home. Nowhere else in the home can one find the privacy or solitude that the bathroom has to offer. A warm shower or bath can wash away the stress and tension that a hard day’s work can cause; leaving you feeling clean, refreshed, and, most importantly, relaxed. It is for these reasons that you should do what you can to make your bathroom a pleasant place to spend time- not a drab, dungeon-like drippy and dirty looking room.

A few things that can make the bathroom a more relaxing place are the lighting, tiling, and layout. A bathroom that feels too bright or dark, ugly, or crowded is not likely to help you shed some of the day-to-day stress in your life, but possibly add to it. Chipped, dirty tiles will cheapen your sense of being, while glaring overhead lights can add to the stress headache that you may already be experiencing. Replacing these things with a more pleasant atmosphere will make you feel much better about your home, and even possibly your life in general.

At Revive Residential Remodeling, we specialize in turning your bathroom into a relaxing room that will provide you with an environment to shed your stress and make you feel like a million bucks. We can provide you with a ton of options in tiling, assist you with a more fluid layout to your bathroom, and present you with many design ideas that you may have never even dreamed existed. If you already have a good idea of what would make your bathroom more to your liking, we can assist you in making that idea become a reality.


For just a taste of some things that we can offer you, head on over to our Gallery, or better yet call Don at 971-285-0770 to schedule a free, no-hassle estimate.

Monday, September 9, 2013

Under-Cabinet Lighting For Your Kitchen Remodel


Why Under-Cabinet Lighting?

Under-cabinet lighting is added to kitchen cabinetry to provide two types of lighting; task and ambiance on the countertop area. Typically in the kitchen the underside of the wall cabinetry can be a dark shadowed area that makes working difficult, this is why the underside of cabinetry provides the ideal location for task lighting. Under-cabinet lighting will reduce these shadows by the cabinetry from the ceiling or pendent lighting. By Illuminating the backsplash this creates can help display your beautiful tile or stone and layer your lighting. The layering of lighting is a method of using all available lights in the kitchen and simply dimming them to create a layering effect for mood or ambiance. 

Under-Cabinet Lighting Types

West Chester Kitchen Remodeling
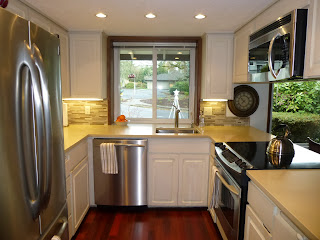
The best lighting fixtures can be purchased at your local lighting design centers, it is recommended that you allow a licensed electrician install the lighting in your home. The lighting availability from these suppliers may use one of three types lamps: LED, incandescent, or fluorescent. These types of lamps influence the performance of the lighting fixture; including the amount of light, the lamp's color, the life of the lamp or fixture, and the lamp's energy usage. Don't know which lamp is best for you? We recommend consulting your local electrician or lighting design store.

Incandescent lamps

Incandescent lamps are the most common types of lighting in kitchens. These lamps come in a variety of selections for under-cabinet lighting; bi-pin,  festoon, and wedge. These selections are available in many different wattages and correlated color temperatures (CCT). CCT refers to the color of the light, (for example, a warm golden tone vs. a clean white tone). Halogen and xenon, are the two most popular because they have a higher CCT, keep in mind these lamps are a cleaner looking white or less golden in appearance. Incandescent lamps are readily available, inexpensive, and easy to replace when one burns out. However, these types of lights have the shortest life spans and the highest energy use of the three types of lamp available. Xenon lamps tend to have the longest life span and can cost about 60 cents more per bulb, depending on the manufacturer. 

LED       

West Chester Home & Kitchen RenovationsLEDs have quickly become popular for a variety of task lighting uses because of their low energy use. these types of lights are the brightest, have the longest life span, but can cost up to three times more the incandescent lighting. Unlike incandescent and fluorescent lamps, LED lamps typically do not burn out, these lights usually have a 50,000 lamp hour rating. White LEDs can be a bluish-white in color appearance than incandescent lamps, though a warm-white LED that looks like the incandescent are becoming more common. White LEDs are generally available in the same color range as fluorescent lamps and can even be purchased in many other different colors such as; blue, red, orange, yellow and green. When selecting the lighting for your kitchen remodel, the best thing you should keep in mind is will this fit into my existing cabinetry configuration?

Fluorescent Lamps

Under-cabinet fluorescent lights are available with linear fluorescent lamps and compact fluorescent lamps (CFLs). Linear fluorescent lamps are the most popular type of fluorescent lighting for under-cabinet fixtures because they have a low profile and can allow the installer to conceal them behind the cabinet light rails (trim). Fluorescent light fixtures can be links together to create one long strain of lights or be broken into numerous single light fixtures. Newer fluorescent lamps have many improvements over older designs, including choice of light color (from warm to cool), good color rendering, these lighting fixtures run cooler and quieter than the older fixtures.
In conclusion I hope this article helped solve your decision making process when you go to make selections in your kitchen remodel. If you have any further questions please fell free to contact us at any time.


For more information on this topic, visit the source of this article at http://elementkitchen.com/remodeling-articles/145-under-cabinet-lighting-for-kitchen-remodels.html

Sunday, August 11, 2013


The 4 Most Common Kitchen Remodeling Mistakes


What’s the secret to a successful kitchen remodel? Knowing what mistakes to avoid! Almost everyone who has been through a remodel has a war story to share about what they’d do differently. Whether it’s the neighbor’s never-ending remodel, or the friend of a friend whose contractor couldn't get along with the architect, keep your dream kitchen from becoming a nightmare by protecting yourself from these common first-timer mistakes.


Mistake #1: Micro Before Macro


While it may be true that your appliances are dated or that your countertops are unattractive, most people don’t focus enough on the big picture. It’s essential that you determine the lifestyle objectives you want your kitchen to hone before you choose its design elements. Why? These objectives can determine the exact types of materials, appliances, and layouts that you should and shouldn’t choose. (Soapstone, for example, is a beautiful counter material, but it requires lots of care—and might not be the best choice for young families.)
Bottom line: Determining your desired kitchen lifestyle before choosing the design elements will save you time and money down the line.


Mistake #2: Thinking Fad, Not Function

 “Beware of the ‘what’s in’ kitchen,” says certified kitchen designer Jennifer Reed. The average kitchen renovation should last 12-15 years, so the last thing you want is for it to feel dated before it’s even paid for. Beware of too-trendy colors and shapes that likely have a short shelf life. Extras like wall-mounted pot fillers are probably only necessary for top-of-the-line chefs; trendy chandeliers might make a statement, but they typically don’t provide appropriate lighting for the space. Similarly, don’t fall prey to over-customization. What works for you today may not work for the next owner of your ho­­me—or even your own family as it grows and evolves. “Be true to the bones of the house,” Reed says. So before you commit to fancy bells and whistles, consider long-term consequences.


Mistake #3: Not Hiring Multiple Professionals


People often think that doing it yourself is the cheapest route. Not so! Varying aspects of the kitchen require professionals with specific expertise. A kitchen designer is not an architect, an architect is not an interior designer, and a contractor is not a kitchen designer. Hire skilled (and licensed) professionals who not only understand lead times for your selections but can also test-drive your budget to make sure it’s sustainable. On the note, don't assume that a big-box retailer offers the most bang for your buck, says certified kitchen designer Jennifer Gilmer. “There’s nothing more satisfying than someone who thinks that they can’t afford design services walks into a showroom and discovers they can redo a kitchen within their budget,” she says. In addition to recommending reputable contractors, savvy design professionals can help homeowners make informed, cost-saving decisions—like swapping a kitchen island for a handsome chef’s table or butcher block—that will keep the aesthetic high, prices low and value priceless. 


Mistake #4: Letting a Contractor or Design Professional Make Decisions For You

Although it’s tempting to delegate all decisions to the experts (decision-making fatigue is quite common in kitchen renovations!), ultimately it’s the homeowners who best understand their own habits. Is the kitchen also your home office, or do you include the kids in dinner preparations? Those activities might dictate choosing a raised island bar versus a flat island. Also important, says certified kitchen designer Susan Serra, is to visit showrooms, flip through magazines, and educate yourself about materials, fixtures, products and costs, “so you will have authentic opinions” when it comes to decision time with design professionals.
Bottom line: Assess your real needs—or even better, what you don’t need—and convey them with confidence.


For more information on this topic, visit the source of this article at http://www.cultivate.com/articles/4-most-common-remodeling-mistakes